
How Long Renovation Dust Lasts and How to Manage It

Renovation dust doesn’t disappear when the work stops. Most airborne dust settles within the first 48 hours after work, but residual dust may appear on surfaces during the first two weeks after work. Managing dust during home renovation means controlling where it travels during demolition and drywall work, then cleaning patiently as particles settle.
It’s frustrating to wipe a surface clean, only to find a fresh layer of dust later. The best approach is to limit dust at its source and clean methodically, rather than relying on one final sweep.
This guide explains how long renovation dust may linger and how to manage it at each stage. You’ll find practical ways to contain dust during demolition, choose HEPA-filtered equipment, and clean drywall dust with vacuuming and damp wiping. A consistent process helps reduce dust migration and restore a cleaner, more comfortable space.
Table of Contents
1. How Long Does Renovation Dust Last?
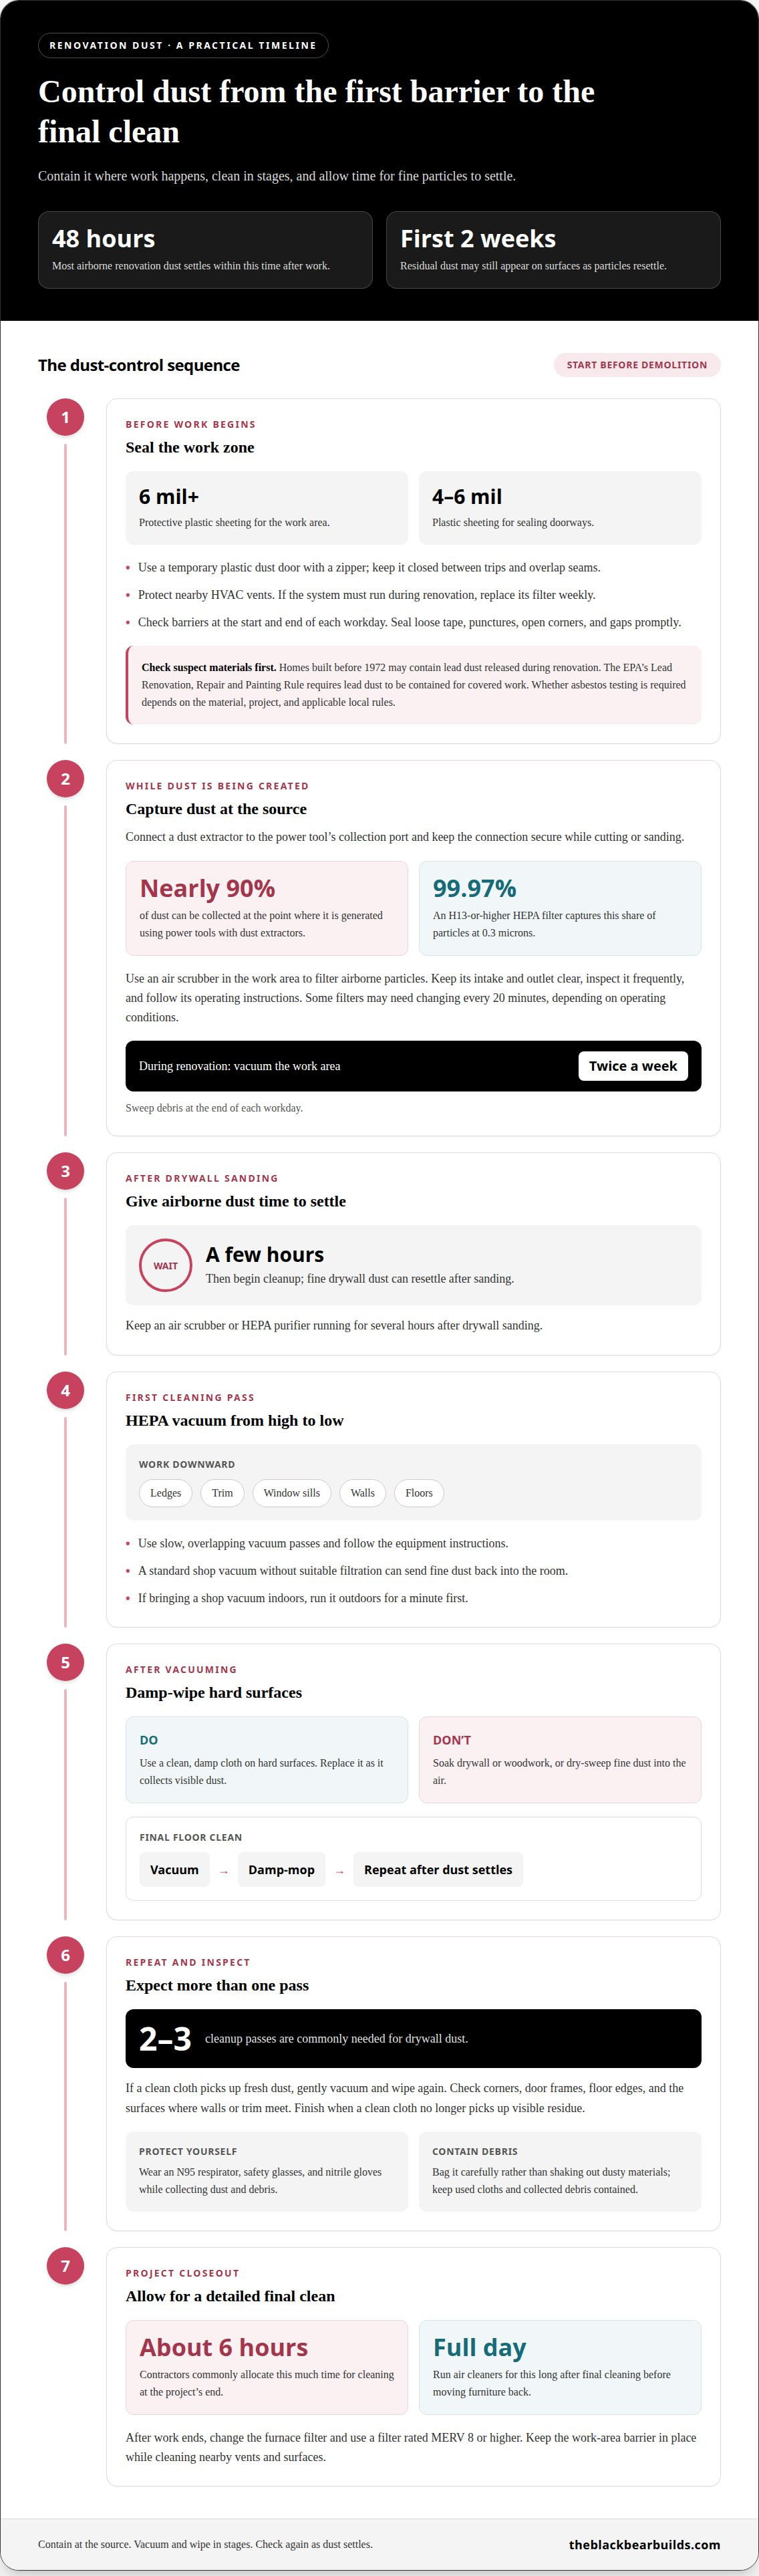
Most airborne renovation dust settles within the first 48 hours after work, but settled particles can keep resurfacing. Residual dust may appear on surfaces during the first two weeks after work, especially after drywall sanding or demolition. The dust’s path matters: particles can escape through open doorways, damaged barriers, and HVAC airflow.
Contain the work area before demolition begins. Use protective plastic sheeting at least 6 mil thick, and seal doorways with plastic sheeting that is 4 to 6 mil thick. A temporary plastic dust door with a zipper creates a controlled entry. Keep the zipper closed between trips, and overlap seams so gaps don’t become routes for dust.
Check barriers at the start and end of each workday. Look for loose tape, punctures, open corners, and dust beyond the entry. Seal gaps promptly, then inspect nearby floors and surfaces for escaped particles. A barrier works only while its edges are sealed and its entry stays closed.
Protect HVAC vents near the work zone to reduce dust entering the system. If the HVAC system must run during renovation, replace its filter weekly. After work ends, change the furnace filter and use a filter rated MERV 8 or higher. Keep the work-area barrier in place while cleaning nearby vents and surfaces.
Renovation dust may contain lead when older materials are disturbed. Homes built before 1972 may contain lead dust released during renovation. For covered work, the EPA’s Lead Renovation, Repair and Painting Rule requires lead dust to be contained. Dust may also involve asbestos-containing materials; whether testing is required depends on the material, project, and applicable local rules. Identify suspect materials before disturbing them.
Requirements for hazardous materials vary by jurisdiction and type of work. Treat containment as a core part of managing dust during home renovation, not just a cleanup step after particles have spread.
2. Cleaning drywall dust with HEPA vacuuming and damp wiping
Drywall dust is fine enough to resettle after sanding, so don’t rush cleanup. Wait a few hours for airborne particles to settle. Then use a HEPA vacuum on ledges, trim, window sills, and other high surfaces. Work from the top of the room downward so falling dust lands where you can still collect it.
Use slow, overlapping vacuum passes on walls and floors, following the equipment instructions. A standard shop vacuum without suitable filtration can send fine dust back into the room. Before bringing one indoors, run it outdoors for a minute. Then wipe hard surfaces with a clean, damp cloth. Don’t soak drywall or woodwork, and replace the cloth as it collects visible dust.
Expect drywall cleanup to take two or three passes. Vacuum and damp-wipe again if a clean cloth picks up fresh dust. For final floor cleaning, vacuum first, then damp-mop, and repeat after dust settles. This staged method removes residue without spreading it through dry sweeping. During renovation, vacuum the work area twice a week and sweep debris at the end of each workday.
Dry cleanup calls for protective equipment. Wear an N95 respirator, safety glasses, and nitrile gloves while collecting dust and debris. Keep the work area contained, and bag debris carefully rather than shaking out dusty materials. At project completion, plan a detailed final clean; contractors commonly allocate about six hours for cleaning at the project’s end. Inspect corners, door frames, and floor edges, where drywall residue can remain after broad surfaces look clean.
After sanding, wait a few hours before cleaning, then use your inspection to guide any final touch-ups. Check where surfaces meet and follow visible dust to nearby ledges or trim. If a clean cloth picks up residue, gently vacuum and wipe the area again rather than brushing dust into the air. Keep used cloths and collected debris contained, and leave closed bags undisturbed. Finish only when a clean cloth no longer picks up visible residue.
3. HEPA air scrubbers and dust extractors
A HEPA air scrubber filters airborne particles while renovation work continues. An H13-or-higher HEPA filter captures 99.97% of particles at 0.3 microns. Place the unit in the work area, where it can draw in dusty air and circulate filtered air. Keep its intake and outlet clear, and follow the equipment’s operating instructions.
Source extraction addresses dust before it spreads. Connect a dust extractor to a power tool’s collection port, then keep the connection secure while cutting or sanding. Power tools with dust extractors can collect nearly 90 percent of dust at the point where it is generated. That makes extraction useful for tasks such as drywall sanding and woodworking cuts, where dust forms directly at the tool.
Sawing, routing, and sanding all create woodworking dust. Use extraction connected to the tool for each task instead of relying on room filtration alone. A table saw, for example, creates dust at the blade, so capture it there and use an air scrubber for particles that escape. Empty collection containers and inspect hoses as needed, since blocked airflow can reduce dust collection.
Filter care matters during dusty work. Some air-scrubber filters may need changing every 20 minutes, depending on operating conditions. Check the unit frequently, and replace filters according to its instructions. A loaded filter can restrict airflow, while a damaged seal can let dust bypass filtration. Keep replacement filters available for extended sanding sessions.
After drywall sanding, keep an air scrubber or HEPA purifier running for several hours. After final cleaning, run air cleaners for a full day before moving furniture back. This gives remaining airborne particles more time to pass through the filters. Pair source extraction with room air cleaning: one captures dust at the tool, while the other filters particles still circulating in the space.
If buying a full set isn’t practical, prioritize extraction for the tools you use most and maintain an air scrubber for airborne dust. Keep the tool connection secure whenever extraction is running, and check that it’s collecting dust before starting dusty work.
4. Task-specific dust control for demolition and drywall
Demolition and drywall work release dust in different ways, so one control setup won’t suit every task. During demolition, dust can rise as materials are broken apart and moved. Power tools are used during about 10 to 20 percent of demolition work, but hand removal can also send dust airborne. Keep debris contained as it’s removed, and avoid carrying dusty materials through clean rooms.
Before demolition, isolate the work area with sealed barriers and establish one entry route. Keep tools and debris inside the zone, and close the entry between trips. Remove waste in controlled loads rather than dropping or shaking it. After each removal period, check barrier edges and nearby floors. A trail of debris can show where dust is escaping.
Drywall sanding spreads fine dust across the wall and nearby surfaces. Capture dust at the tool with extraction and keep sanding within the prepared work area. Inspect the connection and collection system as you work. If dust visibly escapes around the tool, stop and correct the setup before continuing. Use room filtration for particles that remain airborne.
For indoor concrete or tile cutting, control dust at the cutting point. Use wet cutting or a suitable tool-connected dust extractor, and isolate the work zone from occupied areas. Don’t dry-sweep dust from these tasks. Collect it with appropriate equipment and follow the tool’s operating instructions. These steps help limit dust released into the room instead of relying on cleanup alone.
Sequence the work carefully. Complete dusty demolition before drywall finishing, remove debris before sanding begins, then clean the work zone before reopening adjacent rooms. During managing dust during home renovation, matching controls to each task helps limit migration and makes final cleanup more deliberate. For projects that combine demolition and detailed interior work, plan your renovation with a construction team.
Black Bear Construction: Full Home Renovations
Black Bear Construction provides Full Home Renovations for homeowners planning coordinated changes across their living spaces. Dust control is part of the broader renovation plan, from sequencing demolition and drywall work to protecting finished areas during construction. This planning is particularly useful when several rooms or connected spaces are being updated.
For projects that change a home’s layout or add living space, Additions & Structural Work can address the larger scope. Kitchen renovations, custom closets, and laundry niches can also be part of a coordinated plan, with dust containment considered alongside the work. A clear scope helps align construction stages, access routes, and finish protection.
If you’re planning a renovation and want to discuss the project, contact Black Bear Construction.
Plan for a More Comfortable Renovation
Use the renovation plan to define how work areas connect with the rest of your home. Identify which rooms need to remain accessible, where materials will enter, and how workers can reach the project zone without crossing finished spaces. These decisions shape a practical sequence and help keep dust controls aligned with the work as it progresses.
It also helps to discuss how construction stages fit your household’s priorities. A well-considered plan can account for the spaces you use most and the details that matter at completion. Managing dust during home renovation is easier when containment, access, and cleanup are considered alongside the project scope, not left until the last minute.
For a renovation plan shaped around your home and goals, contact Black Bear Construction today. A thoughtful next step can bring greater clarity to the work ahead and help you move toward a finished space with confidence.
Frequently Asked Questions
How Long Does Renovation Dust Last?
Most airborne particles settle within 48 hours, while residue may continue appearing on surfaces for two weeks. The timing depends on how much dust the work creates and whether particles keep escaping from the work area. If a freshly cleaned surface collects dust again, look for an ongoing source, such as active sanding, debris movement, or an unsealed opening.
N95 vs P100 respirators for home renovation dust
For dry cleanup, the article recommends wearing an N95 respirator, safety glasses, and nitrile gloves.

Comments